Learning and teaching with 360° videos in vocational and professional education and training
Topic outline
-
Chapter 2. From Concept to Practice: Four Phases of Creating Immersive 360° Videos for Vocational and Professional Education and Training Purposes
-
This chapter outlines the production process for the design and implementation of 360° videos in VPET. It is structured in four phases according to the Analysis, Design, Development, Implementation and Evaluation (ADDIE) instructional design model. The guidelines are divided into four main phases and 15 sub-phases, providing a step-by-step pathway to guide users throughout the entire process (Figure 2). Each of the four phases is divided into sub-phases, identified through the analysis of nine examined projects. The sub-phases — 15 in total — are structured into step-by-step actions, forming a complete procedure for designing, developing and implementing 360° videos. Within the text are some parts highlighted; these are hyperlinks that lead to multimedia materials available and shortcuts that link to other sections of this same Moodle Course.
Figure 2. Four main phases of the production process for designing and implementing 360° videos in VPET structured according to the ADDIE model. Generated with Napkin AI.
-
2.1. Analysis phase
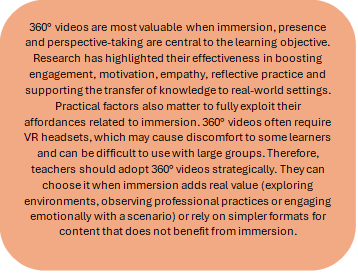
The analysis phase, which comprises various sub-phases, is crucial for assessing the actual need to create immersive 360° videos and for establishing a solid foundation for achieving the intended educational goals. For instance, the choice of using a 360° video with a VR headset could be driven by its immersive nature, which fosters simultaneous physical and cognitive engagement. This format also empowers learners to actively explore the environment, offering a level of autonomy not found in traditional 2D videos, in which attention is directed through controlled framing and camera movements (see Chapter 1). A well-designed 360° video learning experience requires clear educational goals, an appropriate instructional strategy and the careful alignment of context, resources and timing to ensure coherence and effectiveness.
The analysis phase includes the following sub-phases:
1. Familiarise with 360° videos and identify educational values.
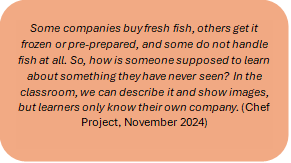
2. Define the target group.
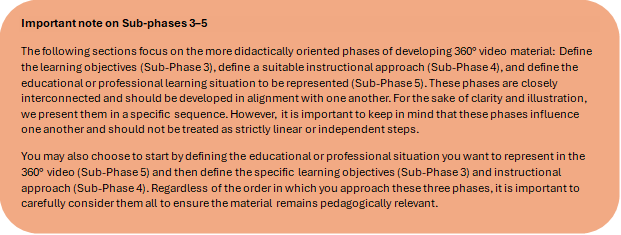
3. Define the learning objectives.
4. Select a suitable instructional approach.
5. Define the educational or professional learning situation to be represented.
6. Define the necessary resources and timeline.
Required competencies
Sub-phase Instructional design with immersive technologies Domain expertise on teaching topic Basic project management Technical competency in 360° video recording and editing 1. Familiarise with 360° videos and identify the educational values ○ ○ 2. Define the target group ○ ○ 3. Define the learning objectives ○ ○ 4. Select a suitable instructional approach ○ ○ 5. Define the educational or professional learning situation to be represented 6. Define the necessary resources and timeline ○ ○ ○ Table 6. Required competencies in the analysis phase.
Required tools and resources
Tools
Sub-phase Requirements Description 1. Familiarise with 360° videos and identify educational values VR headset A virtual reality (VR) headset is a wearable device that covers your eyes—like a pair of goggles—and uses special screens, lenses and motion sensors to create the illusion that you’re inside a computer-generated or 360° environment. Resources
1. Familiarise with 360° videos and identify educational values Catalogue of 360° video examples to be used as a reference The video catalogue is a curated selection of 360° videos showcasing how this format can be used in training. It can include immersive videos in four formats: raw 360 video (not edited), raw 360 video edited, interactive video (not edited) and interactive video edited. 3. Define the learning objectives National Educational Framework Curricula (State Secretariat for Education, Research and Innovation [SERI] or Professional organisations [POs])
&
School Learning Plan
On the websites of the SERI and professional organisations, you can find the framework curricula for the various occupations and training programmes. School curricula specify these guidelines at the individual school level. 6. Define the educational or professional learning situation to be represented Filming location A key resource for planning, developing and capturing a scene as envisioned. The filming location, which is essential in the video recording stage (Sub-phase 6) and depending on its characteristics, inevitably shapes the underlying decisions. Table 7. Required tools and resources in the analysis phase.
-
Sub-Phase 1: Familiarise with 360° videos and identify educational values
This phase serves as a reflective clarification, aiming to show the educational potential of 360° videos as learning tools. This phase clarifies the added value of using 360° videos as learning tools by evaluating whether their features are aligned with the intended educational goals. This step is crucial, as other tools may be more effective depending on specific teaching and learning needs.
What do you have to do? Check whether immersive 360° videos already exist for the educational content you are interested in

Even if similar solutions exist, avoid mere replication. Focus on analysing specific processes to develop tailored approaches that uncover new opportunities and drive innovation.
Choose if you want to develop the 360° video autonomously or in a team
Our experience suggests that developing 360° videos in a team of diverse competencies can be an excellent choice, particularly for teachers creating their first immersive content and aiming for a high-quality video to be reused multiple times. Depending on the context, a teacher may also choose to work independently—an approach that can be equally effective and, in some cases, even preferable—by following the steps outlined in these guidelines.
Familiarise as much as you can with 360° immersive videos

If you work in a team, it is recommended to set up a preliminary meeting with all the people involved in the development of the 360° video (usually a VPET teacher and an expert in educational and immersive technologies). If you are a teacher with no prior experience in the creation of an immersive 360 video for VPET, we suggest beginning the meeting with a showcase of several examples of 360° videos to be viewed with a VR headset. It is highly recommended to include a hands-on activity in which teachers can explore VR headsets and 360° videos to personally experience the impact of immersive technology (e.g. entering a virtual room and interacting within a virtual space). This experience helps teachers to familiarise themselves with VR technology and better define its added value for their specific teaching context.
If you work autonomously and do not have a VR headset, consider borrowing one to experience 360° videos with a VR headset personally. For this purpose, it can be helpful to watch examples of 360° videos, for example, using the YouTube VR (for Meta Quest) app or a catalogue of 360° immersive video examples.
Reflect on how 360° immersive videos could be used in specific educational contexts to obtain a sense of how you could use them in a classroom setting
Whether you are working autonomously or in a group, this is the moment to pause and reflect on a few key questions before proceeding:
- What is the general potential of 360° immersive videos based on my own experience with this technology, for example, in terms of interactivity, immersion or emotional impact?
- What are my intended learning outcomes, and how might a 360° video specifically support them?
- What does a 360° video offer for my teaching purposes that cannot be achieved through other formats (e.g. 2D videos, text descriptions, interactive materials)?
- Can learners benefit from ‘being there’ virtually—for safety, empathy, realism or exploration of otherwise inaccessible environments?
- Can this video be reused or adapted for different learning contexts or audiences in the future?

As highlighted in this interview excerpt, teachers can compare 360° videos with traditional teaching materials, such as static images, to consider their added value. Using these guiding questions can help you make a more informed and purposeful decision about whether creating a 360° immersive video is the right choice for your instructional goals.
What has additionally proven to be helpful - Take the time to fully immerse yourself in different 360° environments. Give yourself the possibility to reflect, rewatch and experiment—that is, actively engage with 360° videos. Experiencing the medium firsthand is essential to truly understand its potential and limitations.
- Explore existing 360° immersive experiences that relate to your teaching subject. Studying examples can spark ideas, highlight best practices and help you envision how this technology could support your own instructional goals.
- Be mindful that creating a 360° video can be time- and resource-intensive, especially if your project demands high production quality or technical complexity. For this reason, it is important to carefully assess the added value this medium offers compared with more traditional formats before committing to development.
-
Sub-Phase 2: Define the target group
This phase aims to clearly identify the target audience from the outset.
What do you need to do? Take into consideration all the different possible target groups
If you are developing a resource for different target groups, it will need to be designed to work for all groups and for each individual at the same time.
Decide the scope of the resource
a) Aimed at a broad group of learners – suitable for use across different school years or professions.
b) Aimed at a specific target group – designed for a specific module and school year.
Some teachers or trainers prefer to reuse the same video with multiple target groups due to limited resources. This approach offers an ‘ecological’ solution, as it allows diverse tasks and learning situations to be addressed efficiently using the same material. This is possible only if you think from the beginning about building the resource to cope with different groups.
What has additionally proven to be helpful If you plan to reuse the same video with multiple target groups, think from the beginning about building the resource to cope with different groups. In this case, the learning situation might become more complex to develop, and designing the resource might require more time and effort.

-
Sub-Phase 3: Define the learning objectives
This phase is focused on clearly defining the core learning objectives of a learning sequence you aim to achieve using the 360° video. Clearly articulating the learning objectives is crucial to ensure that the video serves as an effective learning tool and aligns with the specific needs of the learning context.
What do you need to do? Define a broader topic
In line with the defined target group (Sub-Phase 3), determine whether the topic is highly specialised, targeted to a specific group or general—that is, suitable to a broad audience. For example, an interviewed VPET teacher chose to use a 360° video for a specific technical medical procedure to be practiced and assessed within a determined module in the second year (see Blood Sampling Project).

In another case, one teacher used the same 360° video across multiple school years because its complexity allowed it to be adapted to different levels of expertise. In this case, the focus is on safety in the second year, while it may shift to communication and leadership in the third year (see Paramedics Project).

Establish the macro learning objectives
Clearly define the general goals you aim to achieve with the project. The learning objectives must align with the relevant professional standards, and you may, of course, rely on existing school curricula and National Educational Framework Curricula for the occupation/profession to help you define the macro objectives. Alternatively, you can start from the relevant needs of your target group (e.g. topics that are particularly difficult for them) and ensure that the needs align with the learning objectives.

As previously mentioned in the interview excerpt, learning outcomes should be aligned with the affordances offered by the technology.
Exclude what is not technically feasible
Clearly distinguish between what is technically feasible and what is not. Sometimes, we may want to implement ideas that are currently only possible in theory, as technology still has limitations.

In addition, consider resource constraints, such as the skills available to carry out the project and the technical tools at your disposal. Therefore, stay focused on achievable options and exclude those that are not feasible.
What has additionally proven to be helpful It may be useful to re-specify the learning objectives once the storyboard has been developed (Sub-Phase 7).
Create a template to define the following:
- The competencies to be achieved with the immersive 360° video.
- The challenges faced in the professional situation by learners.
- The practical learning tasks required to achieve these goals (see Table 8 related to ABU Project).
Competency to develop Learning objective Task in the video In general education classes (ABU), students are expected to develop the ability to understand facts and contexts and to become responsible members of a democratic society. The key components of this competency include financial literacy, such as understanding the regulations and procedures related to renting an apartment. To identify defects in an apartment and emphasise the responsibility of the apartment’s owner to address these issues rather than the new tenants; to complete an apartment handover. Identify and describe defects in an apartment. Table 8. Example of a practical learning task
-
Sub-Phase 4: Define a suitable instructional approach
This sub-phase aims to define the instructional approach needed to achieve the intended learning objectives using the immersive 360° video. It focuses on selecting appropriate teaching strategies and methods that take advantage of the unique affordances of immersive technology to engage learners and support the effective development of targeted competencies.
What do you need to do? 1. Choose one or more specific instructional approaches to align with your learning objectives
Based on the defined learning objectives and your pedagogical expertise, select one or more instructional approaches to effectively design or integrate a 360° video into a meaningful learning scenario. The chosen instructional approach will shape the video design, especially during the storyboard development stage (see Sub-phase 5, step 3). Table 9 illustrates the learning objectives, with examples of instructional strategies identified through interviews with educators and educational technology specialists, as well as the projects in which they were applied.
Learning objectives Instructional approach Example project Procedural and motor skill development Demonstration-based training (Rosen et al., 2010) Chef Project Emotional competency development / Experiential immersion Exposure and follow-up (Serino et al., 2014) Paramedics Project Reflective practice and critical analysis Reflective approaches (Asad et al., 2021) Digi-Care Project Collaborative and creative knowledge construction Learning by design and collaborative learning (Kolodner, 1998) Sterile Dressing Procedure Project Table 9. Learning objectives aligned with examples of instructional approaches.
2. Apply key design principles to maximise educational effectiveness
Inspired by multimedia learning theory (see Mayer, 2020; Mayer & Fiorella, 2022), these principles include the following:
Guiding learners’ attention to relevant elements (signalling principle)
A 360° video is an immersive and visually rich 3D environment that can make it easy for learners to overlook important information. To address this, highlight key aspects using visual cues, such as arrows or circles. In 360° experiences, spatial audio is a particularly powerful form of signalling, for example, using directional sounds to prompt learners to turn their heads towards a specific part of the scene.Providing audio explanations of what is happening (modality principle)
Especially in procedural or instructional videos, include spoken narration to describe the actions and processes occurring in the video. This helps reduce cognitive load and supports a deeper understanding.Segmenting complex content into smaller parts (segmenting principle)
When the content is lengthy or conceptually dense, divide it into shorter, manageable segments or ‘chapters’. This allows learners to process the material more effectively and improves retention.Activating prior knowledge
Tailor the experience to different levels of learner expertise by including elements that connect with what they already know. This helps learners integrate new information with existing mental models.If you choose to develop an interactive 360° video, an additional principle must be applied:
Designing meaningful interactions
Avoid adding interactivity merely for the sake of engagement. Instead, ensure that any action required by learners is pedagogically meaningful, supporting reflection, exploration or decision-making that enhances learning outcomes.3. Determine at which stage of the learning sequence you want to integrate the 360° video
You can use established instructional design frameworks, such as Gagné’s nine events of instruction, situation-based didactics (Ghisla et al., 2024), the AVIVA model or Kolb’s experiential learning cycle, to determine at which stage of the learning sequence you want to integrate the 360° video. The video can be a very effective tool, but it is not necessarily used in every phase; its integration depends on the specific learning objectives of the training project. Table 10 provides a more detailed overview of the phases in which a 360° video proved to be particularly useful for a specific project—that is, the Blood Sampling Project.
4. Choose the appropriate assessment approach
Define assessment methods coherent with the learning objectives. You can assess competencies in relation to the 360° video. For example, in the ABU Project, learners were assessed based on the number of defects they correctly identified in the virtual apartment. You can also embed multiple-choice quizzes within the 360° video, as in the Chef Project, although this requires more technical expertise than using a quiz outside the virtual environment. Finally, you can also include a reflective assessment approach. For example, in the Blood Sampling Project, learners identified errors, explained why these were errors and proposed prevention strategies. Teachers assessed the quality of open-ended responses using pre-defined criteria. Table 11 presents the different dimensions of learning outcomes (factual knowledge, procedural knowledge and knowledge transfer) that you would achieve, along with their definitions and examples of assessment methods (Makransky & Petersen, 2021).
Dimension Definition Examples of assessment methods Factual and conceptual knowledge Factual and conceptual knowledge include knowledge of terminology, specific details and elements, classifications and categories, principles and generalisations, theories, models and structures. Pre/post-tests, performance rubrics, follow-up surveys Procedural knowledge Procedural knowledge is defined as knowledge about how to do something (e.g. how to drive a car). Practical tasks, checklists, observation grids Transfer of learning Transfer of learning refers to situations in which learning that has taken place in one context affects performance in another context Project-based assessments, scenario analysis Table 11. Knowledge dimensions and examples of assessment methods.
What has additionally proven to be helpful Bear in mind that integrating a 360° video into an existing lesson plan can significantly affect the timing and structure of your typical teaching session. Allocate sufficient time not only for the activity itself but also for the technical setup of the VR headsets and for transitions between different phases of the lesson. Careful and realistic time planning is essential to ensure a smooth learning experience.
Keep in mind that certain design choices, such as creating an escape room using a 360° video or embedding interactive quizzes, can greatly increase the complexity and, consequently, the duration of the development process. These features often require advanced technical skills and additional development time. It is highly recommended to consult with experienced researchers or practitioners in VR and 360° videos to better estimate the time, skills and resources needed to implement more sophisticated interactive elements.
-
Sub-Phase 5: Define the educational or professional learning situation to be represented
This phase aims to select and define the learning situation (e.g. a professional situation) to be represented in the 360° video.
What do you need to do? 1. Select a situation that enable learners to achieve the learning objectives you have already defined
Based on the added value that 360° videos can provide, along with the previously defined learning objectives and desired outcomes, identify which learning situations are best suited for representation through an immersive video. Consider how to effectively leverage the unique affordances of the 360° format for the chosen context.
2. Select and align the learning situation
Review the relevant curriculum and check that the situation is clear, relevant and aligned with the intended learning objectives. For example, you can refer to a database of standard situations or to scenarios already provided by the national educational framework curriculum to help you choose and define a learning situation that is already aligned with specific learning objectives.
3. Decide how you want to represent the situation
Once you have selected the learning situation to be represented, decide on the format in which it will be recorded and presented. For example, you may choose to depict the following:
– An unscripted or real-world professional scenario
– A scripted and acted scenario
Each format involves different trade-offs, balancing factors such as preparation time, control over the filming process, authenticity of interactions and alignment with learning objectives. Table 12 summarises the main advantages and disadvantages of the unscripted and scripted approaches.
Approach Advantages Disadvantages Unscripted Immediate recording with little or no preparation or storyboard development
Suitable for situational videos that capture spontaneous human behaviours and interactions within authentic environmentsEthical risk of recording people without their consent
Footage that does not fully align with the intended learning objectives
May require extensive post-production work to refine the material and select usable scenes. The teacher or educator also has limited control over the process.Scripted Higher control over the content and filming process, ensuring that the production aligns closely with the educational goals
Actors are aware and give their consentSignificant preparation time, including the development of detailed storyboards, arrangement with actors and careful selection of filming locations
For those unfamiliar with scripting, this process can be particularly challenging.Table 12. Advantages and disadvantages of unscripted and scripted approaches
A loosely defined script is an intermediate option between an unscripted or a fully scripted approach. This represents a broad narrative outline or framework that defines the main storyline, the sequence of scenes and the key actions or situations without prescribing detailed dialogues or actions. It serves as a flexible guide that balances structure and spontaneity, allowing space for natural interaction and improvisation.
4. When planning the filming, ensure that the space and resources fit the learning goals.
For example, (1) if best practice requires a professional to avoid touching objects in the environment, a very small filming space may make it difficult to perform the activity correctly (e.g. Sterile Dressing Procedure Project), or (2) if you need to show how to position the nursing cart in front of a patient, there must be sufficient space within the filming room to do so (see Digi-Care Project).
What has additionally proven to be helpful Collaboration between VPET teachers and professionals ensures that the selected situations are both pedagogically meaningful and professionally relevant and authentic.
Adopt a cyclical approach that links the definition of the learning situation to the specific competencies to develop, allowing for iterative refinement and alignment with educational goals.
One teacher noted that in the future, he would prefer to create 360° videos featuring open-ended scenarios rather than overly detailed ones with fixed outcomes. According to the teacher, open-ended situations promote broader reflections and encourage learners to ask questions that can later serve as the basis for discussion or assessment, depending on the intended learning objectives.
Take the time to reflect on the competencies needed—knowledge, skills and attitudes—to address the situation effectively and professionally. Consider whether these competencies align with the learning objectives identified in Phase 3. Use this reflection as an opportunity to refine and adjust the learning objectives to ensure that they are fully aligned with the demands of the situation.
-
Sub-Phase 6: Define the necessary resources and timeline
Once you have a clear vision of what the 360° video should look like, the next step is to develop a well-structured production plan. This involves identifying the resources required to create the video, including time, skills and infrastructure, and comparing them with the resources currently available to determine what is realistically achievable. Carefully evaluating these factors will help you align your ambitions with practical constraints and set achievable goals for your 360° educational video project.
What do you need to do? 1. If you are working in a team, identify a project manager (otherwise, skip to point 2).
If you are working in a team, especially on projects that go beyond the realisation of a simple 360° video, assigning a project manager is useful for coordinating the resources involved in the project.
2. Identify which technical resources are available and which need to be acquired.
The basic resources required to produce a 360° video include:-
Computer with administrator access
-
Video editing software (Insta software, Qcam software; for more advanced uses, Adobe Premiere)
-
For interactive 360° videos: Software for creating 360° interactive videos (3DVista)
If you do not have all the resources yourself, consider collaborating with the Swiss federal university for vocational education and training (SFUVET) or other institutions that can rent you the infrastructure. The available resources can affect the decisions you will make in subsequent phases.
Another fundamental resource to consider is the location where the scene will be filmed, along with any materials or equipment that need to be featured in the video (e.g. professional tools, instruments or furnishings relevant to the setting). It is important to assess whether the location is readily accessible, needs to be rented or can be provided free of charge through partnerships, such as through collaborations between VPET schools and workplaces. Such arrangements have proven effective in several case studies, including those involving Chef Project, Logistician Project and Digi-Care Project.
3. Organise the project schedule.
Based on the evidence collected, the next step is to estimate how much time you (and each member of the group in the case of a collaborative project) can realistically allocate to the project, considering each phase of the production process. If you are working in a team, share the organisational plan with all members to ensure alignment and confirm that everyone agrees on the scope and timeline. Should you (and your team) conclude that the project is too ambitious, given the available resources, do not hesitate to simplify the plan. This might involve refining the selected learning situation or reducing the complexity of the interactive elements you aim to implement to create a more manageable and achievable project.
-
-
Raw 360° video
Without any post-production changes.
-
Raw 360° video edited
Including audio editing, clip trimming, fade-in and fade-out transitions, as well as tripod masking.
-
-
2.2. Design phaseThe design phase includes only one sub-phase: the development of the storyboard for the immersive video. A storyboard is a practical tool that provides a visual and written representation of the scenes in the situation you plan to develop. This phase is essential because it involves constructing a scene that will be recorded on video. The design phase includes only the (7) storyboard development sub-phase.
Required competencies
Sub-Phase Instructional design with immersive technologies Domain expertise in teaching topic Basic project management Technical competency in 360° video recording and editing 7. Storyboard development ○ ○ Table 13. Required competencies in the design phase.
Required tools and resources
Sub-Phase Requirements Description 7. Storyboard development Tools 360° Storyboard templates
The 360° Storyboard templates provide guidelines that you can customise with your own content. We offer four types of templates: one for a 360° video (without interactive points), one for a 360° video (with active points), one template for active points and a technical storyboard (this last one is helpful for complex projects managed by media designers).7. Storyboard development Resources 360° Storyboard-filled examples
We provide a sample completed storyboard for a complex interactive video, linked to the corresponding produced video, so that you can clearly see the match between the storyboard and the final video.Table 14. Required tools and resources in the design phase
-
Sub-Phase 7: Storyboard development
If you plan to capture a spontaneous, real-world professional scenario, you may choose an unscripted scenario approach and skip this phase. From this point onward, you will find the skip icon Fine con riempimento a tinta unita for procedures related to videos created with a storyboard: it means you can skip the procedure if you want to create a video without a storyboard.
In the context of this guide, the storyboard refers to the set of documents used to plan the video-recording process.
The storyboard can take one of two main forms depending on whether you have chosen to include interactive points in your 360° video:
Detailed fully scripted scenario storyboard without interactive points
Detailed fully scripted scenario storyboard with interactive points
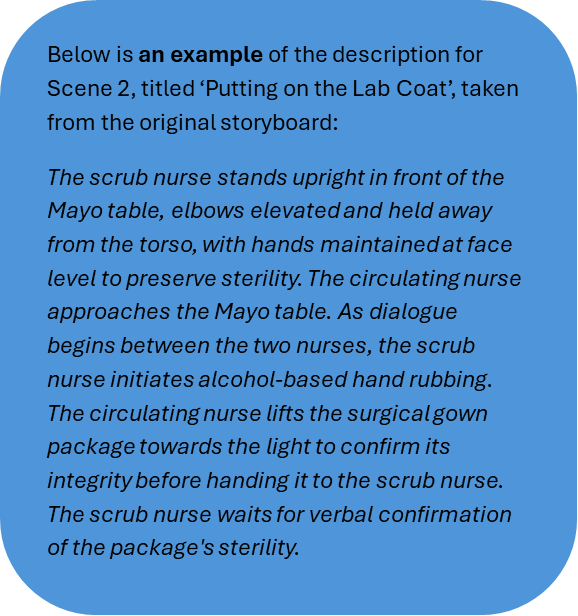
In the first case, the storyboard should include a written script specifying dialogue, narration and key actions, along with a visual breakdown of the video into illustrated frames or sketches, each representing a significant moment or scene. This approach provides clarity for the filming crew and ensures that the recorded content aligns precisely with the intended learning objectives. In the second case, the same procedure used for the storyboard without interactive points should be followed, but an additional column is added to indicate which add-ons are included in the video, what they consist of and how they are integrated (position and duration).
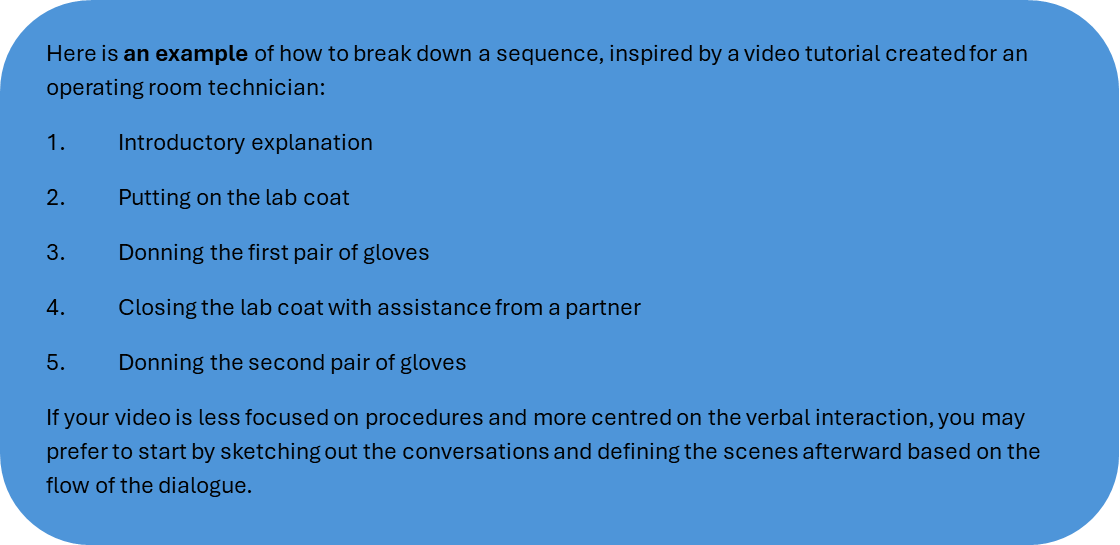
The following section describes the steps for creating a detailed, fully scripted scenario storyboard.
What do you need to do? 1. Establish a narrative sequence divided into scenes
It is essential to develop a coherent narrative sequence—a well-structured timeline that clearly outlines the story to be told or the procedure to be demonstrated. This becomes particularly important when recording a scene longer than 2–3 minutes or one that involves switching between two or more environments. In such cases, it is highly recommended to list and number the different scenes you intend to include. To see the connection between a storyboard and its video, check out the 360° storyboard filled examples and watch the video here.

2. Establish the characters involved in each scene

It is important to define the roles of the characters involved in each scene. This helps determine how many actors will be needed on the day of filming and the level of acting skills required. For example, in the Sterile Dressing Procedure Project video, two nurse students played the roles of the scrub nurse and the circulating nurse. As the video was procedural in nature, professional actors were not necessary. However, if the content focuses more on emotional or communicative aspects, involving experienced actors may be a more suitable option.
3. Provide a description for each scene
After defining each scene, you should provide a detailed description of what happens in the scenes. This includes capturing every element as precisely as possible.
In the context of a 360° video in which communication plays a critical role, scene descriptions should not only focus on verbal exchanges but also emphasise non-verbal cues, including body language, interpersonal dynamics and proxemics. Each action must be described in detail, particularly the actors’ movements: where they go, how they move and why. This level of specificity is essential because it directly influences the placement and orientation of the 360° camera within the scene.
4. Provide audio for the video and define the duration of each scene
The 360° video can incorporate the following elements:
- Dialogue between actors
-
Voice-over explanations
-
Or a combination of both

Specifically for procedural videos, voice-over narration can also be used to explain what is happening within a scene. These descriptions should strike a balance between comprehensiveness and conciseness to convey the necessary information without causing cognitive overload for viewers. Defining the dialogue and voice-over in advance can help estimate the approximate duration of each scene. For example, by timing how long it takes to deliver a line of dialogue along with the corresponding voice-over explanation, you can get a rough idea of how long the scene will last.
Table15 presents how each phase of a scene is aligned with its detailed description, the corresponding dialogue or voice-over and the estimated duration.
Scene number and title Description Dialogue and voice-over Explanations + expected duration of the scene Scene 2: Putting on the Lab Coat
The scrub nurse stands upright in front of the Mayo table, elbows elevated and held away from the torso, with hands maintained at face level to preserve sterility. The circulating nurse approaches the Mayo table. As dialogue begins between the two nurses, the scrub nurse initiates alcohol-based hand rubbing.
The circulating nurse lifts the surgical gown package towards the light to confirm its integrity before handing it to the scrub nurse. The scrub nurse waits for verbal confirmation of the package’s sterility.
C (Circulating Nurse): Good morning, Andrea.
S (Scrub Nurse): Good morning, Nick. Could you please open the necessary materials for me?
C: Of course. I’ll start by opening the laparoscopic surgery kit, which is ready here.
S: Perfect. I just verified the kit a moment ago. Everything is correct, and the expiry date is valid.
C: Great. I’ll proceed, then.
Voice-over (Teacher): The scrub nurse, acting as the guardian of the sterile field, attentively monitors the circulating nurse’s actions.
C: The package is intact and sterile.
S: Thank you.
Voice-over (Teacher): Maintaining the appropriate sterile technique and posture, the scrub nurse then dons the gown. The circulating nurse moves behind to tie it securely.
C: All set. The gown is tied.
Expected duration of the scene: 2 minutes
Table15. Sterile Dressing Project: An example of alignment in the storyboard between dialogue and scene description
Choose the point of view (first- or third-person point of view)
When developing a storyboard, it is important to choose a video perspective based on the desired learning and emotional effects. Different perspectives support different goals: for example, enhancing empathy, showing fine motor skills, clarifying spatial arrangements or presenting interactions among multiple actors. In some cases, combining perspectives can produce the most effective learning experience. For example, in the Blood Sampling Project, two perspectives were intentionally integrated (Table 16): a first-person close-up of the arm (Figure 3) to highlight the manual procedure and a third-person view of the entire room (Figure 4) to illustrate key environmental factors, such as the position of the bed, material preparation and the healthcare assistant’s posture in relation to the patient.
Perspective Advantages Disadvantages First-person point of view (Figure 3)

Figure 3. First-person point of view close-up of the arm
Greater sense of presence and emotional engagement
Useful for perspective taking (entering someone else’s shoes)
Useful for showing manual procedures
Better task immersion (viewer sees exactly what the actor sees)
- It is possible to create a first-person perspective using a tripod, as long as the actors consistently look into the camera, preserving the impression of a first-person viewpoint
Head movements can make the footage shaky
Risk of motion sickness and poor visualisation with head-mounted cameras, especially when moving fast
Lack of interaction can reduce the perspective-taking effect. If the video is too long, it feels unnatural not to respond, while adding an external voice that speaks for you may feel unnatural and reduce the sense of ‘being in someone else’s shoes’.
Third-person point of view (Figure 4)

Figure 4. Third-person point of view of the entire room
Ideal for showing complex procedures and interactions among different actors, looking from outside
- Better spatial awareness: viewers can understand relationships between people, objects and space
Viewers may feel like spectators rather than protagonists
Perspective mismatch: Viewers see something different than what they would see in the first person, reducing training transfer for hands-on tasks.
Table16. Advantages and disadvantages of the third- and first-person points of view.

Consider all the technical elements required to produce each scene
In the storyboard, it is helpful to draw or insert a sketch that illustrates the scene from the intended point of view. In addition, it is highly beneficial to visualise and indicate the position of the camera based on the depicted scenario. Continuing with the example of the Sterile Dressing Procedure Project, you can include a sketch, such as the one below (Figure 5).

Figure 5. Sketch of the scene in the Sterile Dressing Procedure Project
Note: In this example, the red circle represents the placement of the 360° camera within the scene, which helps clarify spatial orientation and ensures accurate staging during filming.
7. For interactive 360° videos, define the interactive points and possible interaction within the 360° video
You can choose to transform a basic 360° video into an interactive 360° video. This means that users will not only watch the video but also actively engage with it through interactive points they can click on. However, proceed with this option only if it will meaningfully support your learning objectives and is feasible, given your available resources. Keep in mind that producing an interactive 360° video requires significantly more technical expertise than creating a basic 360° video.
8. Check if the content developed is coherent with professional standards and professional realities
If available, consult a dataset or a collection of professional scenarios that align with the situation depicted on your storyboard. These may include original video recordings captured in real professional environments, such as in the Digi-Care project, or written descriptions of authentic situations featured in professional curricula.
9. Ask for feedback on the storyboard

Creating a storyboard is a crucial step in the development process, but it can feel overwhelming, especially if it is your first time. If you are working alone, it is highly beneficial to seek feedback from other experts in the field. You can also consult specialists in educational and immersive technologies at the SFUVET for guidance. During the interviews, many VPET teachers emphasised the value of receiving feedback not only from subject matter experts but also from individuals outside the domain. Feedback from non-experts often helps clarify elements that might have been unintentionally overlooked, as explained by the teacher.
If you are working as part of a team, storyboard development becomes an iterative and collaborative process. Typically, the domain expert (often a VPET teacher) begins by drafting the content. This initial version is then refined through ongoing support and input from educational and immersive technology specialists.
10. Final validation of the storyboard
This final stage clearly defines what must be filmed during the video recording days after incorporating the feedback received in the previous phases.
What has additionally proven to be helpful If you are an expert in educational and immersive technologies who supports a VPET teacher in creating a 360° video, it is recommended to divide this complex task into sub-activities, especially if teachers do not have any familiarity with storyboard creation. For example, you can start developing the storyboard for only one or two scenes and then move on to the entire storyboard.
Even when working with a video recording of simulations, a loosely defined script can help to properly plan the video recording.
Creating a separate technical storyboard for filming, distinct from the content storyboard and the one for interactive elements, proved useful (see 360° Storyboard templates).
Having a support group made up of educators and industry professionals who collaborated as a team to suggest improvements and validate the storyboard was highly beneficial (see Digi-Care Project).
Professional actors should ideally be familiar with the occupational/professional field shown in the video to accurately portray the procedures and the communicative and emotional aspects.

-
2.3. Development phase
You are now ready to begin producing your 360° video. The storyboard developed in the previous phase will serve as your primary guide, ensuring that each element of the video aligns closely with the concepts and decisions already established. If you plan to record a real-world professional scenario and opt for an unscripted approach, the sub-phases of the development phase remain relevant. The steps that can be skipped in this case are indicated by this icon Fine con riempimento a tinta unita.
The development phase includes the following sub-phases:
- Prepare for video recording.
- Record the 360° scenario.
- Export the 360° video.
- Edit the 360° video (only for edited video).
- Create and insert interactive points (only for interactive video).
Required competencies Sub-phase Instructional design with immersive technologies Domain expertise in teaching topic Basic project management Technical competency in 360° video recording and editing 8. Prepare for video recording ○ ○ 9. Record the 360° scenario 10. Export the 360° video ○ ○ 11. Edit the 360° video (only for edited video) ○ ○ 12. Create and insert interactive points (only for interactive video) ○ ○ Table 17. Required competencies in the development phase
Required tools and resources Sub-phase Requirements Tools Resources 8. Prepare for video recording Storyboard The storyboard that you have completed and validated. Example of a materials list
9. Record the 360° scenario Organisational tools:
1) List of required materials for the recording day and 2) the detailed plan of the shooting schedule.
Video-recording tools:1) a 360° camera with a charger, 2) SD card, 3) smartphone with camera software, 4) tripod (for the third-person point of view) or a head-mounted bands(for first-person point of view); 5) one laptop (for checking the recordings and uploading them to the headset)
These include your list of required materials for the recording day and your detailed plan for the shooting schedule.
These tools are the minimum required for an immersive 360° shoot to ensure proper recording and improved video quality. See Sub-section 8 and the list of advanced equipment for more details.Proposal for technical features of technical infrastructures 10. Export the 360° video Proprietary software of the 360° cameras It is a software that allows you to export the raw 360° video into an MP4 format. Proprietary software of the 360° cameras (here an example) 11. Edit the 360° video (only for edited video) Video editing software (e.g. Adobe Premiere Pro) Proposal for technical features of technical infrastructures 12. Create and insert interactive points (only for interactive video) 1) The storyboard for the interactive points and 2) tools are used to create graphic content (e.g. PowerPoint [Microsoft] or Photoshop or Illustrator [Adobe]. A necessary tool for designing interactive points within the video. It provides a description of the content, shape, position and duration of each interactive point. 3DVista video tutorial Table 18. Required tools and resources in the development phase
-
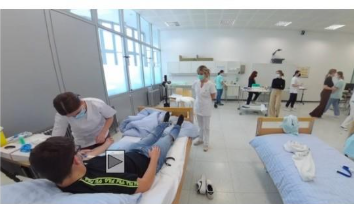
Sub-Phase 8: Prepare for video recording
This phase aims to plan and prepare for the actual video recording. It is essential to minimise the risk of unexpected issues during filming and to ensure that the process runs as smoothly as possible. You can start preparing for the video recording day a few months in advance, depending on the complexity of the project and the logistics of your video recording.What do you need to do? 1. Inspect the location where the scene will be filmed
Conducting a preliminary on-site inspection is highly recommended, as it enables a thorough assessment of the location’s suitability and helps identify any additional requirements. Only by visiting the site can you gain a clear and accurate understanding of what is needed in terms of props and technical equipment. For instance, if the space lacks adequate lighting, supplemental lighting may be necessary (the golden rules for 360° video recording).
It is also crucial to determine which materials and supplies are required to meet the intended learning objectives and achieve the desired level of physical realism. This includes identifying key props and set elements. To enhance authenticity, ensure that all necessary professional equipment is incorporated into the scene.
It is also advisable to bring a 360° camera during the inspection to test different camera angles and perspectives (see Sub-Phase 9: Video recording of the 360° scenario, Steps 3 and 5). This allows you to evaluate which positions will work best on the actual day of filming and to ensure optimal framing and coverage.
2. Create a list of the materials you will need on the filming day
It is important to arrive at the filming location with all the necessary materials and equipment ready for use. This preparation ensures a smooth recording process and helps prevent any critical items from being overlooked.
A basic list of materials may include:
- A 360° camera with charger
- SD card
- Smartphone with camera software installed (e.g. Insta 360° app or Qoocam)
- Tripod (for the third-person point of view) or head-mounted bands (for the first-person point of view)
- One laptop (for checking the recordings and uploading them on the headset)
Additional materials to improve the video recording quality may include:
- Lavalier microphone
Additional materials to create the interactive points contents (only for interactive video):
- One camera (also a good smartphone can be sufficient)
3. Develop an organisational plan for the filming day
This guideline is particularly important for the video recording of a fully scripted scenario. You can skip this step if you plan to record a non-scripted scenario. Plan the video-recording session based on the storyboard you have prepared.
We recommend allocating time for at least one rehearsal per scene and recording at least two takes of each scene. Based on our experience, a video-recording day for a fully scripted scenario can last 4–8 hours.
For complex scenarios, consider involving additional technical support. You can find an example of the organisational plan here.
4. If actors are involved, create clear acting guidelines for them


Regardless of whether the actors are professionals or amateurs, it is essential that they know exactly what is expected of them. In addition to the storyboard, provide clear filming instructions adapted to the situation.
Guidelines should include instructions on how to interact with a 360° camera and profession-specific guidance when relevant. An alternative practice is to involve actors with expertise in the occupational field.
5. Test the camera
Camera checks should include:
- Testing battery life and preparing a replacement battery
- Checking for overheating during extended use
- Evaluating camera placement and filming angle
- Ensuring secure mounting
If possible, bring a backup 360° camera and review test footage with a VR headset to assess immersion and identify potential side effects.
What has additionally proven to be helpful - When working in a team, it is helpful to define the roles in the video recording plan. Assign a director (person with more technical skills) to visually monitor whether the scenes unfold as planned. This can be done remotely via a smartphone or tablet when using a 360° camera. At the same time, another person (the VPET teacher and the domain expert) should check whether the dialogue and the content of the scenes match the storyboard by listening to the live audio through a microphone connected to a computer (see Sub-Phase 9: Video recording of the 360° scenario, Step 5). These roles must be clearly assigned and followed on the day of filming to ensure smooth coordination and avoid confusion.
- Before the real videorecording, make short video examples to get an idea of the result.
- Debrief actors before the video recording on how to perform on camera or provide training in advance. This helps them feel more confident and natural during the shoot
.
- Consider scheduling breaks during recording to prevent the device from overheating and to avoid unexpected shutdowns.
-
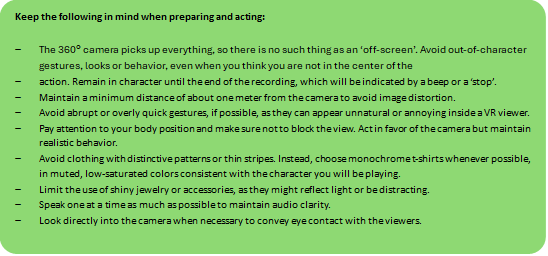
Sub-Phase 9: Record the 360° scenario
The goal of this phase is to guide the video recording of the scenes outlined on the storyboard.
What do you need to do? 1. Re-test the camera
It is important that, on the day of the recording, ideally before arriving on set, you test the camera one more time.
- Check the battery life.
- Check the memory capacity of the SD card.
- Control the support for the camera (tripod or head-mounted bands).
- Ensure that the camera lenses are clean before the shoot.
2. Set the location for video recording

Time to prepare the filming environment is often limited; thus, it is crucial to optimise each step of the setup process. Recreate the environment you designed on the storyboard, strategically placing objects and adjusting the brightness of the space.
Lighting conditions can vary significantly depending on the location, so take time to observe the space carefully and make any necessary adjustments to ensure optimal visibility and image quality.
In addition, make sure to remove any objects that are not relevant to the scene. As a 360° camera captures footage in every direction, it is essential to ensure that nothing unintended or distracting appears in the final recording.
3. Position the camera accurately
One key consideration is the height of the camera operator relative to the person being filmed. Ideally, interactions should take place with the camera positioned at the viewer’s eye level to create a more realistic and engaging perspective.
The field of view can be limited, and certain actions may not be clearly visible in the final footage. In such cases, it may be necessary to trim or supplement the video with additional images to ensure clarity and coherence (the golden rules for 360° video recording).
4. Support the actors

Have the actors understood everything? Are they comfortable in their roles, natural and not anxious? You can schedule a moment to recap the most important do’s and don’ts (check the guidelines for actors) and help them ease into their roles.
5. Record the video using a 360° camera
During video recording, the crew must remain outside the room to avoid being captured on camera, as 360° cameras record in all directions. For this reason, the video director must maintain control over the scene remotely. To achieve this, you can use the smartphone app provided by the 360° camera manufacturer to monitor the scene in real time from outside the recording space. This setup allows you to see what is happening visually but does not provide audio monitoring. If audio is an important component of your scene, it is recommended that you use at least one external microphone connected to a computer. This setup enables the simultaneous monitoring of both video (via the smartphone app) and audio (via the computer). Alternatively, it is advisable to listen to the recordings—even from outside the filming room—to ensure that the dialogue and sounds are clear and understandable. The VPET teacher or domain expert should take responsibility for this role. They are also in charge of ensuring that the recorded content aligns with the storyboard and confirming when a scene has been successfully completed.
6. Ensure that the footage was captured effectively
Using a checklist can help verify that everything has been properly captured. This checklist should include not only the visuals but also the audio.

-
Sub-Phase 10: Export the 360° video
This phase aims to export your 360° video in a format that is compatible with both VR headsets and computers. Regardless of the level of complexity you have chosen for your production (i.e., raw 360° video (not edited), edited 360° video, interactive 360° video (not edited), or interactive 360° video (edited), the following procedure describes how to export the video in its original state before any edits or enhancements are applied.
What do you need to do? 1. Export the video footage to your computer using camera software
To transfer the recorded videos to your computer, you will need to use the software that comes with your 360° camera. You can export the videos either directly to your local drive—provided that there is enough available space—or to an external hard disc drive.
Most camera software also allows for basic trimming, such as cutting the beginning and end of a video. If you need support, watch the video tutorial on how to use the proprietary software of the 360° cameras (example here).
2. View the video in 360° mode on a desktop computer
To view your 360° video on a desktop computer, you need to download software such as the VLC player, which is available on both the Windows and Mac app stores or directly from the official VLC website (link).
This software allows you to watch 360° videos on your desktop and rotate the view using your mouse.
or
3. View the video on a VR headset
In this case, you have two options:
- Upload the video to YouTube VR as an unlisted (private) video.
- Transfer the video manually from your computer to the appropriate folder on your VR headset.
For more advanced editing options, please refer to Sub-Phase 11 of this guide.
-
Sub-Phase 11: Edit the 360° video (only for edited video)
The goal of this phase is to perform advanced video editing and go beyond the basic features offered by the proprietary software of 360° cameras. In this case, you have chosen to develop an edited 360° video. At this point, you can:
- Synchronise or add external audio (e.g. from a microphone) to the 360° video.
- Enhance video quality, including adjustments to brightness, contrast and colour.
This phase typically requires more advanced technical skills, such as using professional video editing software such as Adobe Premiere Pro or other tools that support 360° video editing.
What do you need to do? 1. Organise the video footage
Create a clear folder structure to organise all recorded videos and give each file a descriptive name to avoid confusion. This will make the import process in the video editing software (e.g. Adobe Premiere Pro) much easier, especially if you’ve recorded the audio separately using an external microphone.
Organise the folders in a way that allows you to easily match each video with its corresponding audio file and quickly synchronise them (Table 19).

Table 19. Dtatabase of recorded videos: 3DVista - Sterile Dressing Procedure Example
2. Import the video to another video editing software
After selecting the clips you want to use, import them to your chosen editing software (e.g. Adobe Premiere Pro or other video editing tools). Choosing the appropriate clips and images is crucial, especially if you use multiple cameras. Always keep your original goal in mind.
3. Cut and organise the clips
Use the editing tools to cut out any unnecessary or repetitive parts, following the guidance received, to make the narrative smoother and more effective. However, when editing 360° videos, it is important to cut them thoughtfully. Abrupt cuts can reduce viewers’ sense of immersion. Edits should either be as seamless and ‘invisible’ as possible or they should be clearly narrated and contextualised so that viewers do not feel lost.
4. Improve the quality of the audio, if required
By using software such as Adobe Audition or Audacity, you can edit the recorded audio to enhance its overall quality. Basic improvements could include reducing background noise, adjusting volume levels, removing unwanted clicks or pops and equalising the sound to make voices clearer and more pleasant to listen to. Even small adjustments can make a big difference in the final results.
5. Synchronise the audio with the video clip
If you used an external microphone, this is the time to synchronise each audio track with its corresponding video clip (e.g. three clips → three correctly assigned audio tracks). It is essential that audio and video remain perfectly aligned to avoid any latency or noticeable mismatch for the user (Figure 3).
6. Export the edited video and import it to the editing software to create the 360° video
Once the editing is complete, export the file and upload it to the software dedicated to creating immersive videos.
If required, add interactive elements
Take the interactive points storyboard you have already created as a base in Sub-phase 11.
Upload the video to 3DVista
Import the video to 3DVista to complete the 360° integration. If you are working with other experts, plan for three rounds of review: an initial draft, a mid-stage evaluation and a final review. Validate each step with the technical team to ensure consistency with the defined educational and technical specifications.

-
Sub-Phase 12: Create and insert interactive points (only for interactive video)
This phase aims to demonstrate how to create and insert interactive points into the 360° video. At this stage, you can use this guide for both interactive 360° video (not edited) and interactive 360° video (edited) formats.
What do you need to do? 1. Take the interactive points storyboard you have already created

This is your guide to creating the actual interactive points, adjusting as needed, based on the video editing. If another person is handling this part, provide them with the storyboard for the interactive points and work together to define their purpose so that the graphics align with your objectives.
2. Create graphics for the interactive points
Use software to create a base for your work, such as PowerPoint or Illustrator, by inserting the content you want to display interactively within the video. Adapt the content and graphics to what was defined in the interactive points on the storyboard. During the storyboard design phase, elements such as resources, timing and the placement of content within the video are planned. However, some placement details may need to be adjusted later for consistency when the interactive elements are added. If there is text, it should be reviewed, especially in terms of size and length, to improve readability. A structured color theory (look here) can also be applied, using neutral soft tones to reduce visual overload. The icons used to access or activate the interactive points can be selected based on symbolic meaning, for example, to represent concepts such as reflection or questioning.
3. Choose a software tool to create the interactive point
The software you decide to use will depend on your skill level, whether you are working with a technical expert and the type of computer you have. In practical terms, it comes down to how familiar you are with graphic design software and how powerful your computer is (see Chapter 1 for more details). A computer’s performance mainly depends on its graphics card. Check out the proposal for technical features of technical infrastructures.
4. Import your video project to the 3DVista software
Upload all the resources that you will use for the project—panoramic videos, videos, text, images and graphics—to 3DVista.
5. Organise the graphics for your interactive points
Create a folder—for example, label it as ‘Interactive Points’—and move all the images and graphic elements you have created to it. This will keep everything in one place and easily accessible when you need it.6. Insert the interactive points as planned
In the desired scene, place each interactive point by importing its corresponding graphic. In this way, you will turn your static images into interactive elements in 3DVista.
7. Assign an action to each interactive point
For each point, select the desired action (e.g. opening a pop-up, playing a video, linking to another scene, etc.) from the list available in the properties panel. Some pre-structured options are available.
8. Adjust the position of the interactive points
Move and resize the interactive points directly in the scene, making sure that they are clearly visible and accessible to the user without obstructing the 360° view.9. Include ‘button’ points that allow users to control the video
Add elements such as play and pause buttons, an episode menu, options to go back, rollover effects and text fields (using the invisible text format if needed).
10. Export the content for headset and computer
To display your video correctly, export it to the appropriate devices, such as a Meta Quest headset or the desktop version (computer). Follow this procedure to export the content.
What has additionally proven to be helpful Explain to the user how to use the 360° video experience (e.g. which buttons they have) and provide them with a tutorial with instructions when possible.
Remember that creating animations needs much time; include this in the storyboard.
Use simple and meaningful icons for interactive points.
Plan the narration with the voice-over: When using a voice-over, it must not be cut off by an interactive point to ensure consistency.

-
Completed storyboard for a complex interactive video, linked to the corresponding produced video
-
2.4. Implementation and evaluation phaseThis phase aims to provide guidance in implementing 360° videos in educational settings and evaluating their effectiveness. Because 360° videos are a relatively new technology, it is advisable to assess their impact before scaling their use in other contexts. This evaluation phase also helps to identify the necessary changes to the design of the 360° video resource.
The implementation and evaluation phase includes the following sub-phases:
-
Prepare the lesson plan.
-
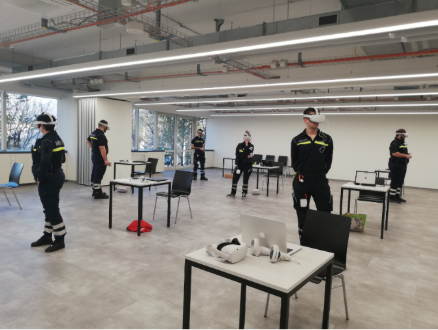
Implement the 360° video in class.
-
Evaluate the effectiveness of the 360° video.
Required competencies
Sub-Phase Instructional design with immersive technologies Domain expertise in teaching topic Basic project management Technical competency in 360° video recording and editing 13. Prepare the lesson plan ○ ○ 14. Implement the 360° video in class ○ ○ 15. Evaluate the effectiveness of the 360° video ○ ○ Table 20. Required competencies in the implementation and evaluation phase
Required tools and resources
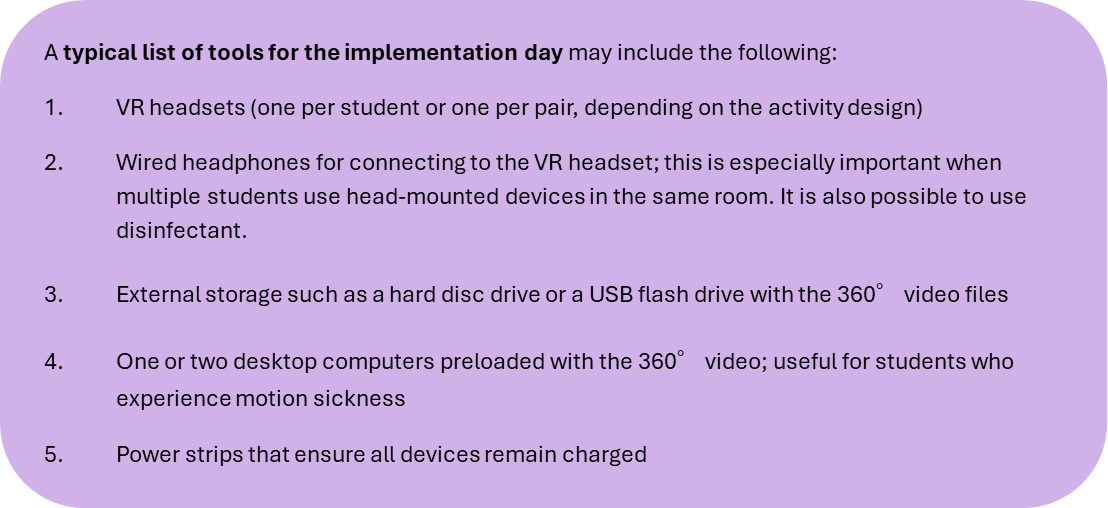
Sub-Phase Requirements / Tools Description 14. Implement the 360° video in class VR headset
Laptop
Wired headphones
External storage
One or two desktop computers preloaded with the 360° video
Power strips
VR hygiene wipes
15. Evaluate the effectiveness of the 360° video Tools for quizzes ( e.g. Qualtrics or Moodle)
Resources
13. Prepare the lesson plan Existing lessons plans or schools lessons plans Table 21. Required tools and resources in the implementation and evaluation phase
-
-
Sub-Phase 13: Prepare the lesson plan
In this sub-phase, you learn how to create a lesson plan for integrating a 360° video into your teaching. It explains how to design learning activities before, during and after the video, prepare all the necessary materials and equipment and plan assessments to evaluate students’ perceptions and learning outcomes. It also highlights the importance of reserving a suitable space in advance.
What do you need to do? 1. Integrate the 360° video into a lesson plan
The 360° video should be embedded within a well-structured and logical instructional sequence. To do this effectively, it is essential to develop a comprehensive lesson plan that outlines all the intended learning activities, the time allocated to each and the materials required. You can refer to the work completed during the analysis phase—that is, when you have already identified the target audience, the learning objectives and the instructional approach—to help shape your lesson plan.
At this step, you are transforming your initial design into an actionable programme. The following guide questions can support your planning:
What types of activities should precede the viewing of the 360° video? (e.g. activating prior knowledge, introducing learning objectives)
What activities should take place during the viewing? (e.g. interacting with embedded interactive points, observing specific aspects of a professional situation)
What should follow the video? (e.g. teacher-led debriefing, simulations or role playing)
When and how will you assess the learning objectives and the added value brought about by the 360° video?
How much time can be dedicated to each activity?
When preparing your lesson plan, also consider all the materials needed on the day of implementation.

2. Prepare your assessment materials
Evaluation can take place at two primary levels: a) perceptions (of students and/or teachers) and b) learning outcomes (of students).
Perceptions
Students’ perceptions offer valuable insights into the subjective experience of using the 360° video. The key dimensions to consider include the dimensions shown in Table 22, and quantitative or qualitative methods can be used to collect the data.
Dimension Sample questions Engagement (Venkatesh et al., 2003) How engaged did you feel with the 360° video? Satisfaction (Reynolds et al., 2017) Were you satisfied with the 360° video? Perceived Learning Do you feel you that you learned effectively? Relevance (Reynolds et al., 2017) Was the 360° video content relevant to your goals? Confidence (Reynolds et al., 2017) Do you feel more confident in the subject after using it? Table 22. Examples of survey dimensions in students’ perceptions
Teachers’ perceptions may be assessed using similar dimensions, with the addition of aspects such as instructional effectiveness and cost effectiveness compared with traditional or alternative teaching methods.
Learning Outcomes
Learning outcomes focus on measurable improvements in students’ knowledge, skills and attitudes resulting from the 360° video experience. These can be evaluated through a range of indicators (see Table 11 on p. 13, inspired by Makransky & Petersen, 2021).
This two-tiered approach allows for a more comprehensive evaluation of the 360° video’s impact, balancing subjective perceptions with objective indicators of student learning.
3. Reserve your room in advance

Figure 5. Paramedics Project classroom settings
Be sure to reserve a room in advance that provides enough space for students to use VR headsets comfortably (see Figure 6 for an example).
Casella di testo 4, Casella di testoPlan for sufficient space between students (approximately 2 meters) to ensure safety and comfort during use. This means that you should allocate at least this amount of space for each student, along with a minimum of 1 meter of distance between them, to ensure safety and comfort during use.
If a large room is not available, consider splitting the group into two separate rooms to ensure a safe and effective learning environment. In this case, it is recommended that a second teacher or technical support staff member supervise and assist both groups. It is also advisable to choose a room with a reliable internet connection, especially if you plan to use online tools for quizzes, tests or other interactive modules.
4. Prepare your students
Determine if any of the students have conditions that could prevent them from using a 360° video in immersive mode (see Chapter 1, Inclusivity and Accessibility section, p. 7). This will allow you to plan an appropriate alternative for the students.
What has additionally proven to be helpful
- You may consider seeking support from researchers or individuals with strong expertise in evaluation methods to receive feedback on your assessment approach. They can also assist you in identifying examples of validated measurement scales.
- If other teachers are involved in the implementation of the 360° video lesson, it is recommended that a preliminary training session be conducted. During this session, teachers can try the VR headsets themselves and become familiar with the lesson plan. This approach was successfully applied in the ABU project, for example.
- If you work in a VPET school with a large number of students, you might consider conducting a more structured evaluation, as was done in the Chef Project. In that case, the school divided the students into two groups: one group used the VR headsets, while the other followed a traditional lesson. All participating teachers were informed in advance about the evaluation process and were instructed to deliver the same content to both groups to avoid biasing the results. Such studies are not about declaring one method (e.g. using a 360° video) as universally better, but they help identify the strengths and limitations of each approach and clarify in which contexts 360° video can be most beneficial for learners.
- In class, it is always advisable to have a second VR headset available so that you can charge one while using the other, alternating them between participants to avoid slowdowns or interruptions caused by low batteries. If necessary, schedule breaks between sessions (e.g. after two participants) to allow recharging and ensure the continuity of the activity.
-
Sub-Phase 14: Implement the 360° video in the classroom
Integrating a 360° video into teaching offers unique opportunities for immersive and experiential learning. Rather than proposing a rigid step-by-step procedure, this chapter proposes a possible structure for a 360°-based lesson unit that can be adapted.
What do you need to do? Get Your Students Ready
1. Start with an Introduction
Purpose: Present your learning objectives and outline the structure of your lesson.
Optionality: Recommended.
When: Usually at the start.
How: Give a verbal briefing or use a PowerPoint presentation on how to use a 360° video.
2. Check What They Already Know (Pre-test)
Purpose: Assess your students’ prior knowledge so you can tailor activities and measure learning gains later.
Optionality: Optional but highly valuable for improving your course.
When: Before the immersive 360° video activity.
How: Conduct a knowledge test (e.g. using multiple-choice or open-ended questions).
3. Provide a VR Tutorial
Purpose: Make sure your students know how to operate VR headsets and interact with 360° environments.
Optionality: Required for first-time users.
When: At the start of the first VR lesson. Skip it in later sessions if students are already familiar with it.
Variants: Show a video walkthrough, conduct a live demo or give them a printed quick-start guide.
Deliver the Immersive Experience
4. Run the Immersive Activity with a 360° Video
Purpose: Engage your students in a situated, interactive learning experience.
Optionality: Required.
When: Whenever your students are ready to watch the 360° video. This is the core of your lesson.
How:
Single viewing with guiding questions
Multiple viewings (e.g. initially without interactivity and then with hotspots)
Paused sections for discussion and reflective activities
Assess and Debrief
5. Test What They Learned (Post-test)
Purpose: Measure immediate knowledge gain.
Optionality: Optional but highly valuable for course improvement.
When : After the immersive activity with the 360° video. You can also do this later to assess medium-term and/or long-term retention.
Variants: Conduct the knowledge test again (e.g. using multiple-choice or open-ended questions).
F. Debrief and Obtain Learner Experience Feedback
Purpose: Collect data on your students’ immersion, cognitive load and perceived relevance.
Optionality: Optional but highly valuable for course improvement.
When: Immediately after the immersive activity or later to capture more reflective responses.
Variants: Likert-scale questionnaire, short interviews, group discussion.
Encourage Reflection and Application
6. Facilitate Reflective Activities
Purpose: Deepen understanding through discussion and critical analysis.
Optionality: Recommended.
When: After the immersive activity; can also take place between viewings.
Variants: Whole-class debate, think–pair–share, written journals.
H. Provide Procedural Practice
Purpose: Help students apply the skills learned in the 360° video to real-world tasks.
Optionality: Optional, depending on your learning goals.
When: After the immersive activity or as a follow-up session.
Variants: Role play, simulated environment, hands-on practice with rubrics.
What has additionally proven to be helpful
In the Digi-Care Project, a 1) ‘user manual’ was developed. This guide was designed to support other teachers in downloading the 360° video and gaining practical ideas on how it can be integrated into their own teaching practices. It includes a description of the video scenes, clearly stated learning objectives linked to competencies, user instructions for setting up and using the VR equipment, a list of required materials and a 2) ‘guide to the interactive points’ in the video, detailing their content, timing and related objectives.
If students feel uncomfortable using the VR headset (e.g. headaches, dizziness), it may be helpful for them to take a short break. In most cases, the symptoms are short lived, and the immersive experience can continue. It may be more comfortable for students to watch the 360° video while seated.
-
Sub-Phase 15: Evaluate the 360° video effectiveness
If the lesson includes evaluation activities in the implementation phase, there is an opportunity to analyse the collected data to evaluate whether integrating the 360° video added value to teaching and learning. Evaluation analyses the collected data to determine the effectiveness, quality and impact of the 360° video solution. This phase also supports iterative improvement, as the insights from the evaluation can inform future design and development cycles.
Please note that the evaluation phase did not clearly emerge in the interviews, as the focus was primarily on the development of the 360° video and only marginally on subsequent classroom implementation and evaluation.
In the analysed project, evaluation was mainly conducted by the researchers rather than by the teachers themselves. Researchers usually examine the collected data to inform VPET teachers and school leaders about the impact of the activities. If the results are positive, this can also serve as a motivational boost for other teachers, as knowing that the method is effective may encourage them to adopt it themselves.
What has additionally proven to be helpful At this stage, collaborating with researchers can be beneficial. Researchers may be interested in supporting your analysis. Such partnerships are mutually advantageous: Schools and teachers can focus more on instructional activities while saving time on data analysis, and researchers have the opportunity to test empirical hypotheses in authentic, real-world educational settings.
-
How to import 360° videos on local memory on Meta Quest
-
How to import and export on 3DVista Meta Quest
-
How to import and export on 3DVista computer
-
How to import and export on Youtube
-
How to import a 360° video and add hotspot in 3DVista
-
How to import a 360° video and add hotspots in 3DVista
-
Golden rules for video recording
-
Hotspot design comparison
-
This learning unit is licensed under CC BY-NC-SA 4.0, unless otherwise stated for specific content.
-

